Read-Write APEX application fully based on alien data or is it mandatory to use exactly Oracle Database?
Is it possible to base an APEX application on top of, let's say, PostgreSQL? What about MySQL? The answer is YES, it is possible right now! Find out how in the article.


I am sometimes asked by my fellows whether it is possible or not to base an APEX application on some foreign database, in example PostgreSQL or MySQL. I always answer positively, but so far didn't have a chance to explore the topic in detail. In this article I am going to show you at least two possible ways of how to do it right now.
The aim
We are going to develop an APEX application inside an Oracle Database 18c XE and base it on data provided by an alien database. In our case it is going to be PostgreSQL (but it doesn't have to). On top of PostgreSQL we are going to organize a REST interface. Then, by leveraging Oracle Database and APEX capabilities to consume REST interfaces, we are going to implement CRUD functionality over two simple departments and employees tables, using two different approaches.
So, in the end, our application is going to be able to read and write data from two native PostgreSQL tables, and represent them as interactive reports.
Before we start
In the article I am going to consider a setup with two separate hosts - the first with Oracle Database and APEX and the second with PostgreSQL. In my case they both are going to be virtual machines powered by CentOS Linux 7.5 and resided in the same local network area. IP addresses are 192.168.88.30 and 192.168.88.31 for the Oracle and Postgres hosts respectively.
However, you don't have to go for the same setup and install software on different hosts, it is done here to make the post more general, and you should be quite ok with Oracle Database and PostgreSQL installed on the same machine. In such a case it would even work faster since there would be no network involved.
Also assume that all the commands in the article are run as a root user.
PostgreSQL side
As I already mentioned, as an alien database, where our data is going to be, we will be using PostgreSQL. And we need REST interface on top of it. There are several solutions for this, such as PostgREST or pREST, which are open-sourced standalone tools written in Haskell and Go correspondingly. Both tools give their users a fully functional REST representation of SQL on top of a database, so no particular handlers needed. This is very similar to what we see when use ORDS REST enabled SQL feature. I stopped on PostgREST, which I found quite reliable judging by its users feedback.
Installation of PostgreSQL
- Install EPEL and official PostgreSQL repos:
yum epel-release -y
rpm -Uvh https://yum.postgresql.org/10/redhat/rhel-7-x86_64/pgdg-centos10-10-2.noarch.rpm
- Install PostgreSQL 10 using yum:
yum install postgresql10-server postgresql10-contrib postgresql10 -y
- Initialize database and enable PostgreSQL daemon:
postgresql-setup initdb
systemctl start postgresql-10
systemctl enable postgresql-10
- Create a new database user which will own our tables:
su - postgres
createuser --interactive

Enter name of role to add: restapi
Shall the new role be a superuser? (y/n) n
Shall the new role be allowed to create databases? (y/n) n
Shall the new role be allowed to create more new roles? (y/n) n

createdb restapi
exit
- Edit your PostgreSQL Client Authentication Configuration File:
mcedit /var/lib/pgsql/10/data/pg_hba.conf
- And enable password authentication (make sure the file looks like below), then save changes:
# TYPE  DATABASE        USER            ADDRESS                 METHOD
"local" is for Unix domain socket connections only
local   all             all                                     md5
# IPv4 local connections:
host    all             all             127.0.0.1/32            md5
# IPv6 local connections:
host    all             all             ::1/128                 md5
- Restart PostgreSQL server:
systemctl stop postgresql-10
systemctl start postgresql-10
- Now we are ready to create our tables and load some sample data. For this, download the file I prepared for you and, being in the same directory with the file, load it to the database using
psql:
psql -U restapi -f postgresql-data.sql
Installation of PostgREST
- Download PostgREST binaries from GitHub and extract them to
/usr/bin
wget https://github.com/PostgREST/postgrest/releases/download/v5.1.0/postgrest-v5.1.0-centos7.tar.xz
tar -Jxf postgrest-v5.1.0-centos7.tar.xz -C /usr/bin
-
Daemonize your PostgREST instance. Instead of doing all this you can run it manually.
- Create PostgREST configuration file:
mkdir -p /etc/postgrest touch /etc/postgrest/config- Put some configuration into it (more here):
db-uri = "postgres://restapi:restapi@localhost:5432/restapi" db-schema = "public" db-anon-role = "restapi" db-pool = 10 # listen on all interfaces server-host = "0.0.0.0" # listen on port 8000 server-port = 8000- Create a file for new
systemdmodule for PostgREST service:
touch /usr/lib/systemd/system/postgrest.service- Edit it and add the following
[Unit] Description=REST API for any Postgres database After=postgresql-10.service [Service] ExecStart=/bin/postgrest /etc/postgrest/config ExecReload=/bin/kill -SIGUSR1 $MAINPID [Install] WantedBy=multi-user.target- Enable and start PostgREST service:
systemctl enable postgrest systemctl start postgrest- Tweak firewalld to allow connections to PostgREST:
firewall-cmd --permanent --new-service=postgrest
firewall-cmd --permanent --service=postgrest --set-short="PostgREST" --add-port=8000/tcp
firewall-cmd --permanent --zone=public --add-service=postgrest
firewall-cmd --reload
Testing of the environment
Ready to test it? Just open http://your-ip-address-here:8000 in your browser. In my case it's http://192.168.88.31:8000. If you see generated Swagger docs, then everything is alright. Otherwise, look into /var/log/messages where PostgREST writes its logs by default for the reason it doesn't work.
As an alternative, you also can use Postman to test your freshly implemented REST API server.
Oracle Database and APEX side
Be aware of the fact that I am assuming that you already have a running APEX environment. If you don't, then you are welcome to use my very detailed guide on how to create one.
But you also should know that I am going to use some features only available in the newest versions of Oracle Database (working with JSON in PL/SQL) and APEX (APEX_EXEC package). It's quite safe to go for Oracle Database 18c XE and Oracle APEX 18.2, which are currently available to download.
You also should allow outgoing connections for the APEX internal user by creating a proper ACL. This is needed to be able to make REST calls out from APEX applications. For APEX 18.2 this user is called APEX_180200, so to allow outgoing connections without restrictions by host, run this as SYS:
begin
    dbms_network_acl_admin.append_host_ace(
        host       => '*',
        ace        => xs$ace_type(
            privilege_list => xs$name_list('connect'),
            principal_name => 'APEX_180200',
            principal_type => xs_acl.ptype_db
        )
    );
end;
/
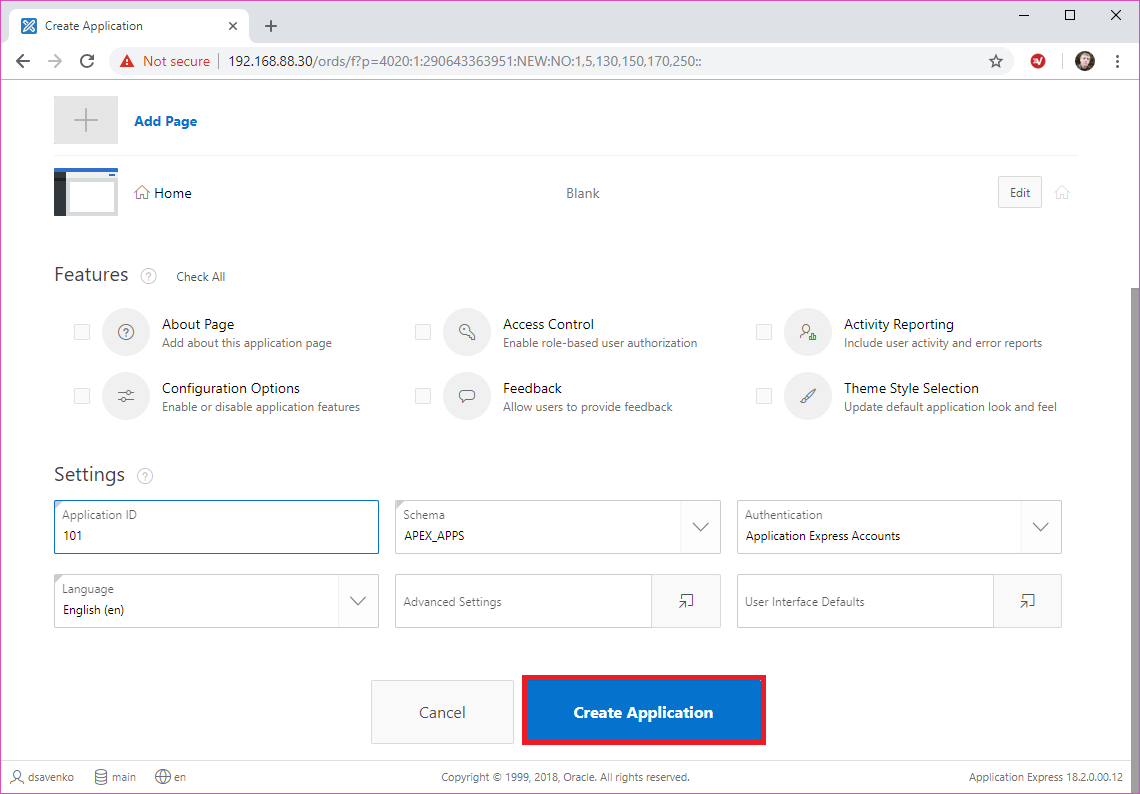
Then, to start with the application development, choose a workspace or create a new one and then create a new application in it, all settings could be left in their defaults.
And from now on we'll be considering different approaches to fulfil the task.
Declarative way
At the moment I am writing this post APEX support declarative capabilities for Web Source Modules only partially.
But the functionality is already on the roadmap, so very soon I'll be rewriting this section of the post in order to tell you how to do everything in a declarative way.
Semi-declarative or APEX_EXEC way
This approach consists of three main steps to perform:
- Define a Web Source Module under Shared Components for the application.
- Add an Interactive Report region onto the application's page, and base it on top of just created Web Source declaratively.
- Use the power of
APEX_EXECpackage to implement writing procedures for the report programmatically.
Let's sort them out in detail.
Definition of Web Source
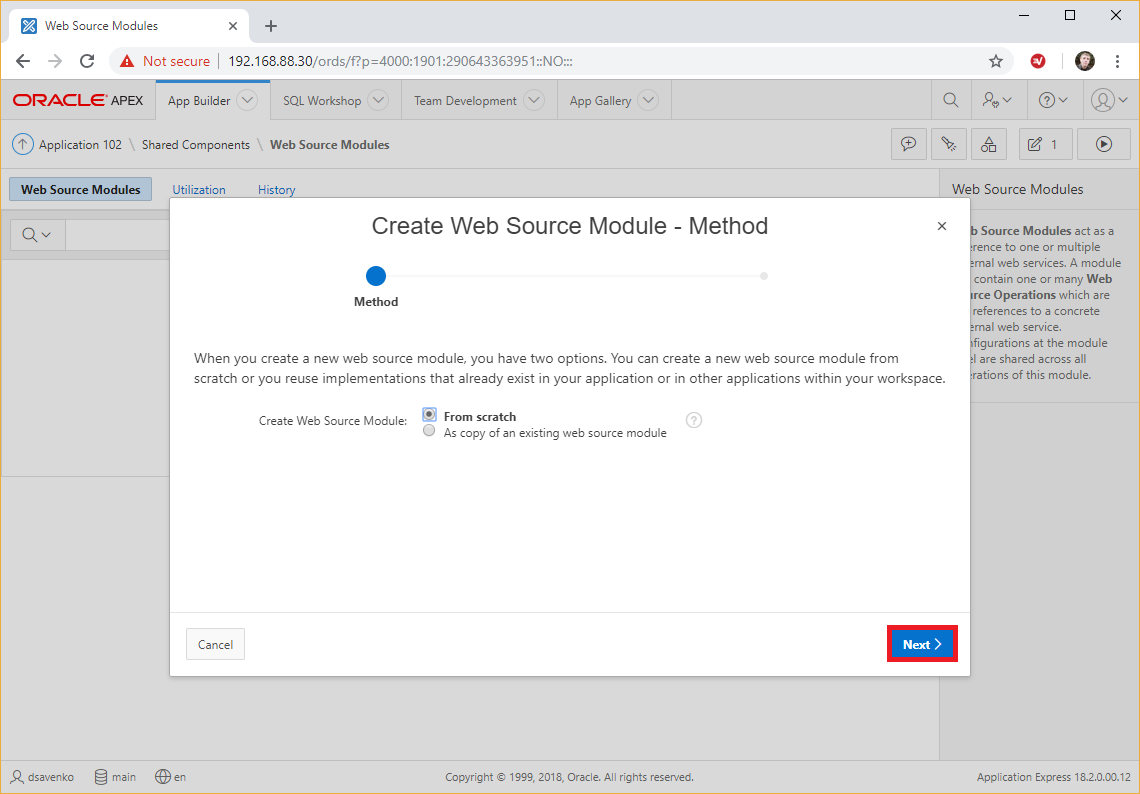
First of all, go to Shared Components from AppBuilder home page and choose Web Source Modules.

Click Create button and choose From Scratch, then click Next.
Leave Simple HTTP for the Type, since we are not going to use ORDS-based API, specify the Name and the URL Endpoint for the service. In our case they're going to be ALIEN_DEPARTMENTS and http://192.168.88.31:8000/departments respectively.
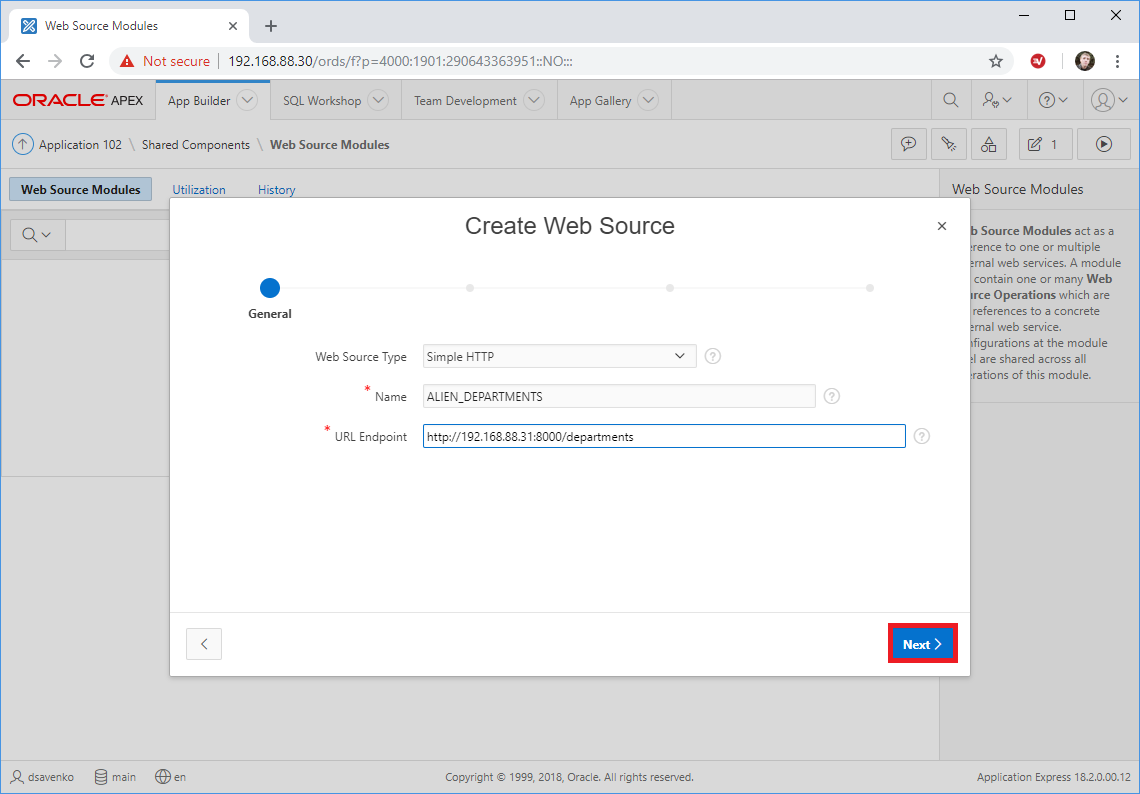
Leave everything by default on the following two screens, click Next button two times, and then click Discover.

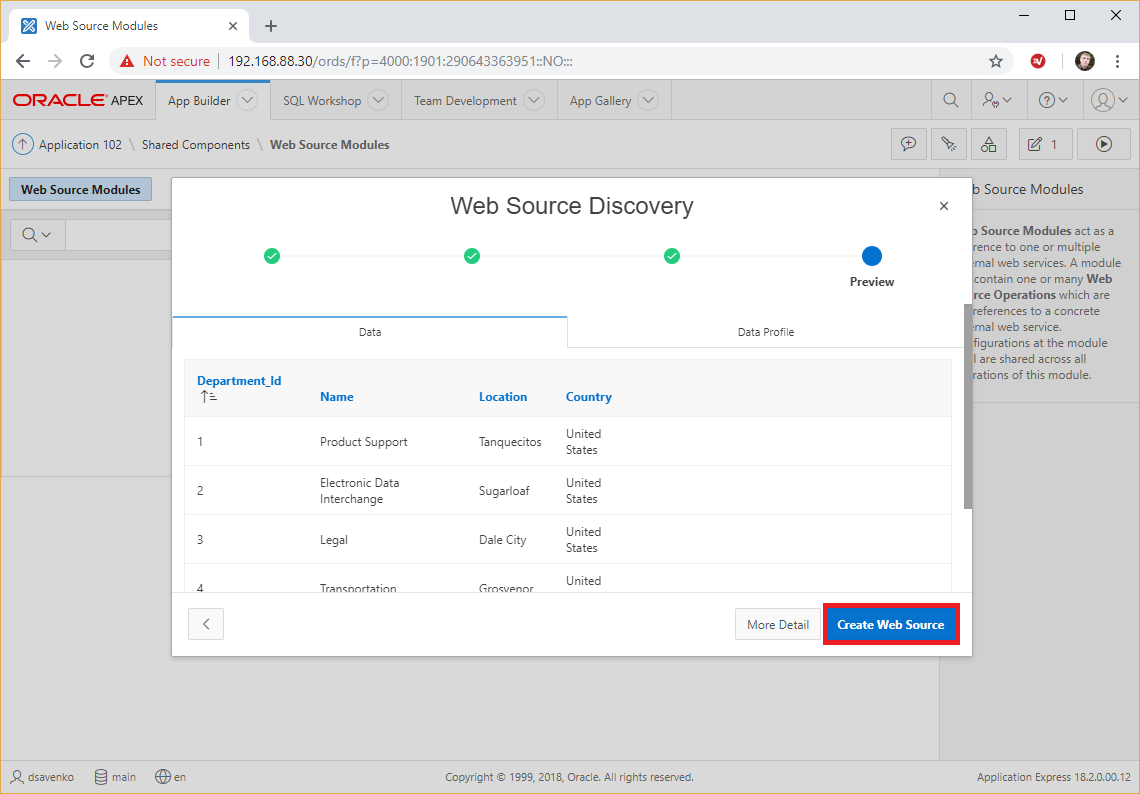
If everything is ok, you'll see the preview screen. Check it out and click the Create Web Source button.
When the module is created, click on it to expand the details. You can check its data profile by clicking on Edit Data Profile button, but since our table is pretty simple, APEX likely to guess all the datatypes correctly without our help. What we need to do is add other operations for our service. To do so, click the Add Operation button.

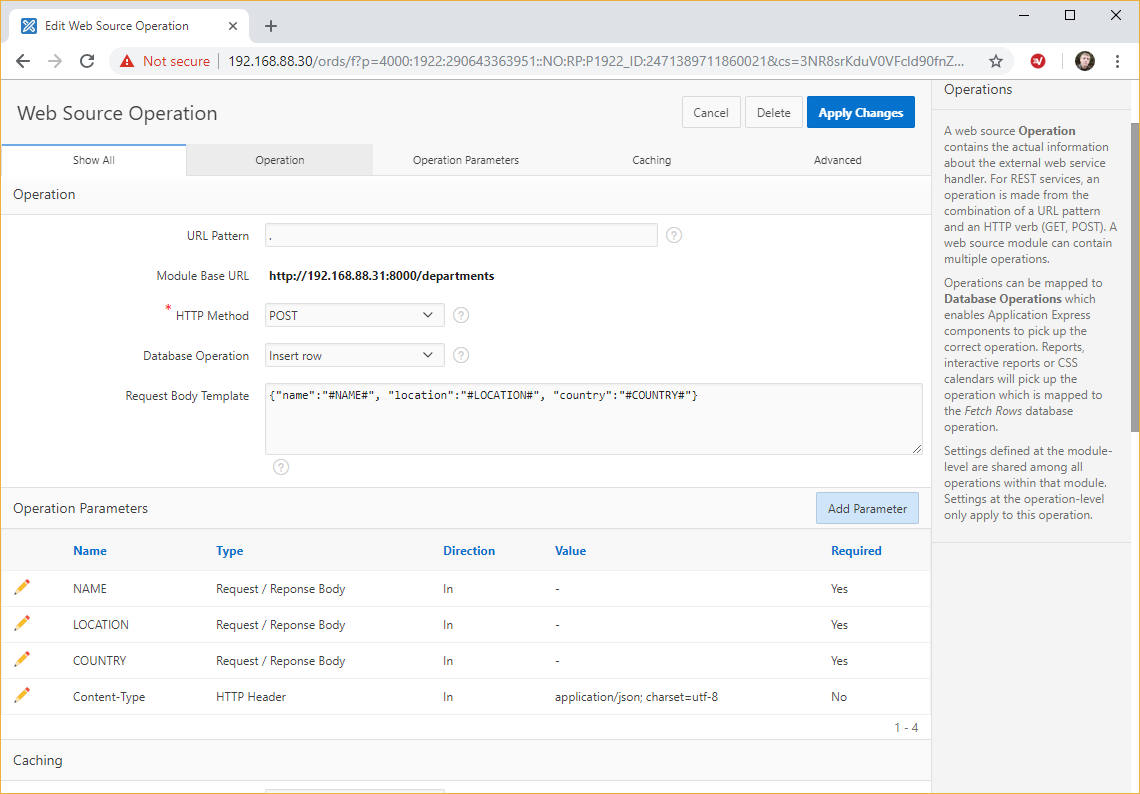
First, we are going to add the POST operation. It represents the INSERT database operation in PostgREST. So, put dot symbol for URL Pattern, choose POST for the HTTP Method and Insert row for Database Operation. For Request Body Template use this JSON string: {"name":"#NAME#", "location":"#LOCATION#", "country":"#COUNTRY#"}.
Mind how I used placeholders for parameters. Then for each placeholder we need to add a parameter. Also, there's important to add a header parameter for Content-Type. As a result, you should have something like this.
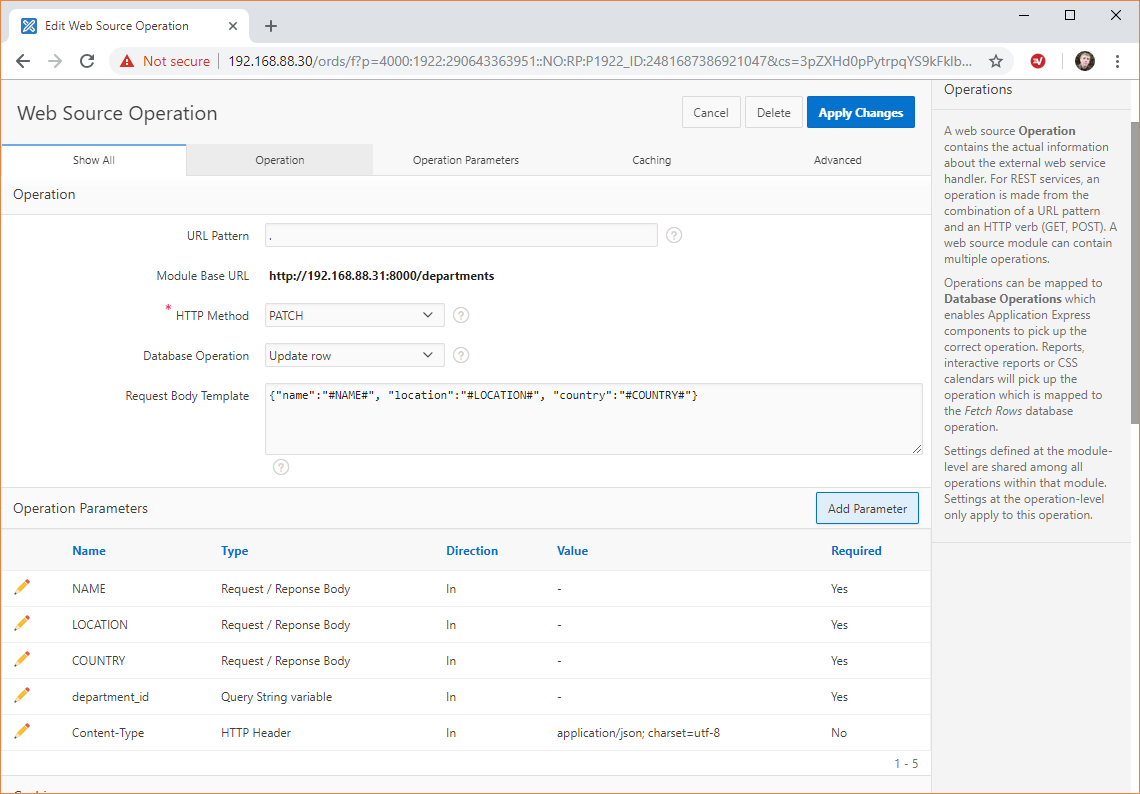
Similarly, we should add PATCH operation for the UPDATE database operation in PostgREST. The difference is in one addtional query string parameter department_id, which specifies what row to update.
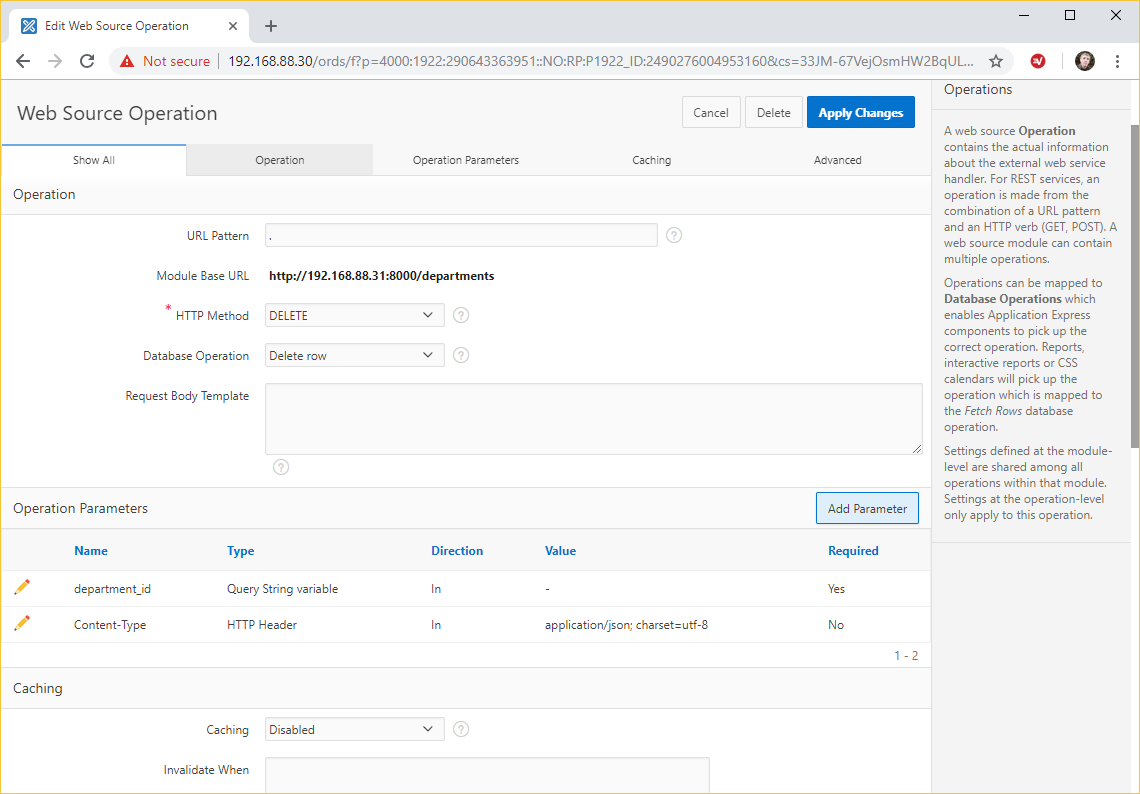
Last operation to add here is the DELETE, which serves the same database operation in PostgREST. Here we don't have to specify any parameters, but the only query string parameter department_id, which tells what row to delete.
When you complete these steps, your Web Source Module metadata is succesfully saved in the application and now you can use it for report regions and for APEX_EXEC procedures calls.
The code
Now I'd like you to switch to your favourite PL/SQL IDE and create a package with a set of procedures to work with the web service we have just created. Let's call this package ALIEN_DATA_MANAGEMENT and compile it as a workspace parsing schema user.
Package specification:
create or replace package alien_data_management is

procedure add_department(
  p_name varchar2,
  p_location varchar2,
  p_country varchar2
);

procedure update_department(
  p_department_id integer,
  p_name varchar2,
  p_location varchar2,
  p_country varchar2
);

procedure delete_department(
  p_department_id integer
);

end alien_data_management;
/
Package body:
create or replace package body alien_data_management is

procedure add_department(
  p_name varchar2,
  p_location varchar2,
  p_country varchar2
) is
  -- parameters collection variable
  l_parameters apex_exec.t_parameters;
begin
  -- prepare the parameters for the Web Service operation
  apex_exec.add_parameter(p_parameters => l_parameters, p_name => 'NAME',     p_value => p_name);
  apex_exec.add_parameter(p_parameters => l_parameters, p_name => 'LOCATION', p_value => p_location);
  apex_exec.add_parameter(p_parameters => l_parameters, p_name => 'COUNTRY',  p_value => p_country);

  -- invoke POST operation, defined in the Web Service definition
  begin
    apex_exec.execute_web_source(
        p_module_static_id => 'ALIEN_DEPARTMENTS',
        p_operation        => 'POST',
        p_parameters       => l_parameters
    );
  -- we are handling VALUE_ERROR exceptions because of
  -- weird ORA-06502: PL/SQL: numeric or value error
  -- after a successful PostgREST API call
  -- more here: https://community.oracle.com/message/14988842
  exception when VALUE_ERROR then
    null;
  end;
end add_department;

procedure update_department(
  p_department_id integer,
  p_name varchar2,
  p_location varchar2,
  p_country varchar2
) is
  -- parameters collection variable
  l_parameters apex_exec.t_parameters;
begin
  -- prepare the parameters for the Web Service operation
  apex_exec.add_parameter(p_parameters => l_parameters, p_name => 'department_id', p_value => 'eq.'||to_char(p_department_id));
  apex_exec.add_parameter(p_parameters => l_parameters, p_name => 'NAME', p_value => p_name);
  apex_exec.add_parameter(p_parameters => l_parameters, p_name => 'LOCATION', p_value => p_location);
  apex_exec.add_parameter(p_parameters => l_parameters, p_name => 'COUNTRY', p_value => p_country);

  -- invoke POST operation, defined in the Web Service definition
  begin
    apex_exec.execute_web_source(
        p_module_static_id => 'ALIEN_DEPARTMENTS',
        p_operation        => 'PATCH',
        p_parameters       => l_parameters
    );
  -- we are handling VALUE_ERROR exceptions because of
  -- weird ORA-06502: PL/SQL: numeric or value error
  -- after a successful PostgREST API call
  -- more here: https://community.oracle.com/message/14988842
  exception when VALUE_ERROR then
    null;
  end;
end update_department;

procedure delete_department(
  p_department_id integer
) is
  -- parameters collection variable
  l_parameters apex_exec.t_parameters;
begin
  -- prepare the parameters for the Web Service operation
  apex_exec.add_parameter(p_parameters => l_parameters, p_name => 'department_id', p_value => 'eq.'||to_char(p_department_id));

  -- invoke POST operation, defined in the Web Service definition
  begin
    apex_exec.execute_web_source(
        p_module_static_id => 'ALIEN_DEPARTMENTS',
        p_operation        => 'DELETE',
        p_parameters       => l_parameters
    );
  -- we are handling VALUE_ERROR exceptions because of
  -- weird ORA-06502: PL/SQL: numeric or value error
  -- after a successful PostgREST API call
  -- more here: https://community.oracle.com/message/14988842
  exception when VALUE_ERROR then
    null;
  end;
end delete_department;

end alien_data_management;
/
Ok, let's have a closer look at the package and its procedures.
The add_department procedure's purpose is obviously to insert a new department into the table in the alien database. As you can see, before invoking the web service POST operation, we prepare parameter values leveraging special apex_exec.add_parameter API. This function has a set of overloads to accept values of different data types. Then, the only thing which is done in the procedure, is the apex_exec.execute_web_service call. Yes, it's that easy.
The next, update_department procedure is different from the previous one only in two aspects - it has an additional parameter department_id and the type of operation being performed here is PATCH. This tells PostgREST to transform our call into the UPDATE SQL statement instead of INSERT.
The delete_department procedure looks even simplier, because it has only one parameter - department_id. Also, the web service operation which is used here is DELETE, which reflects DELETE SQL statement in the remote database.
Right, now we are ready to start with our interactive report and a form on it.
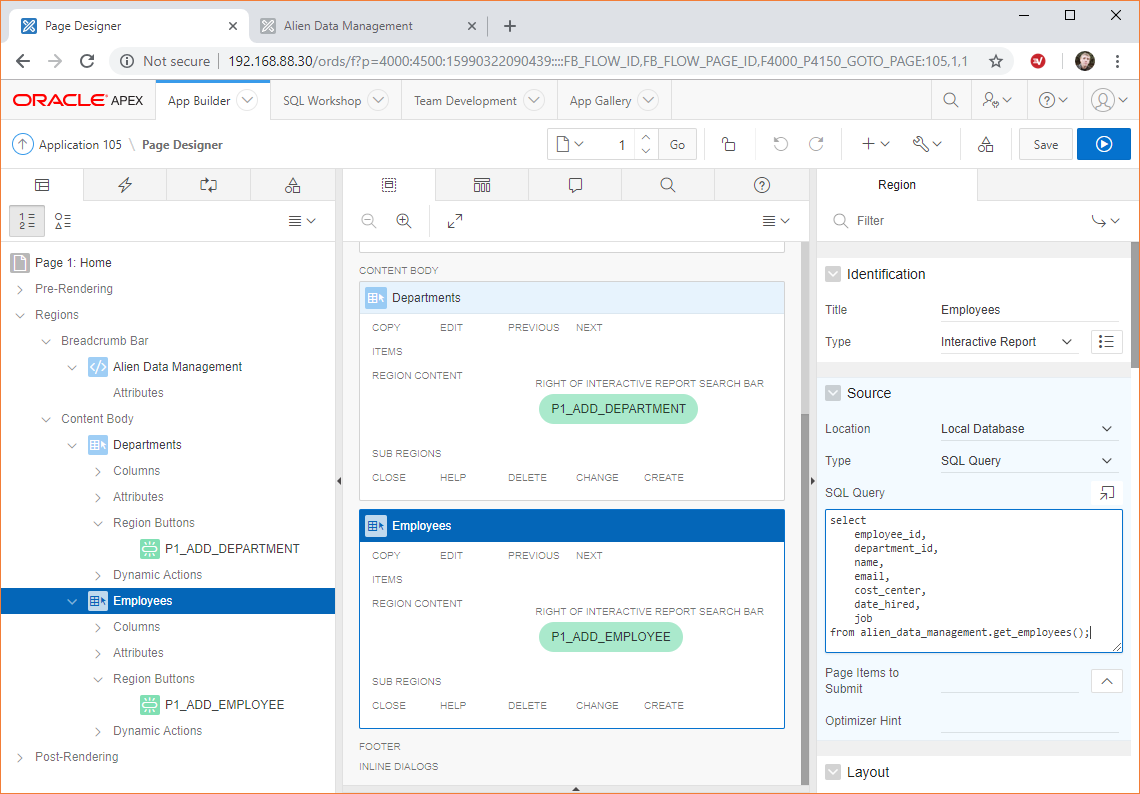
The report and the form
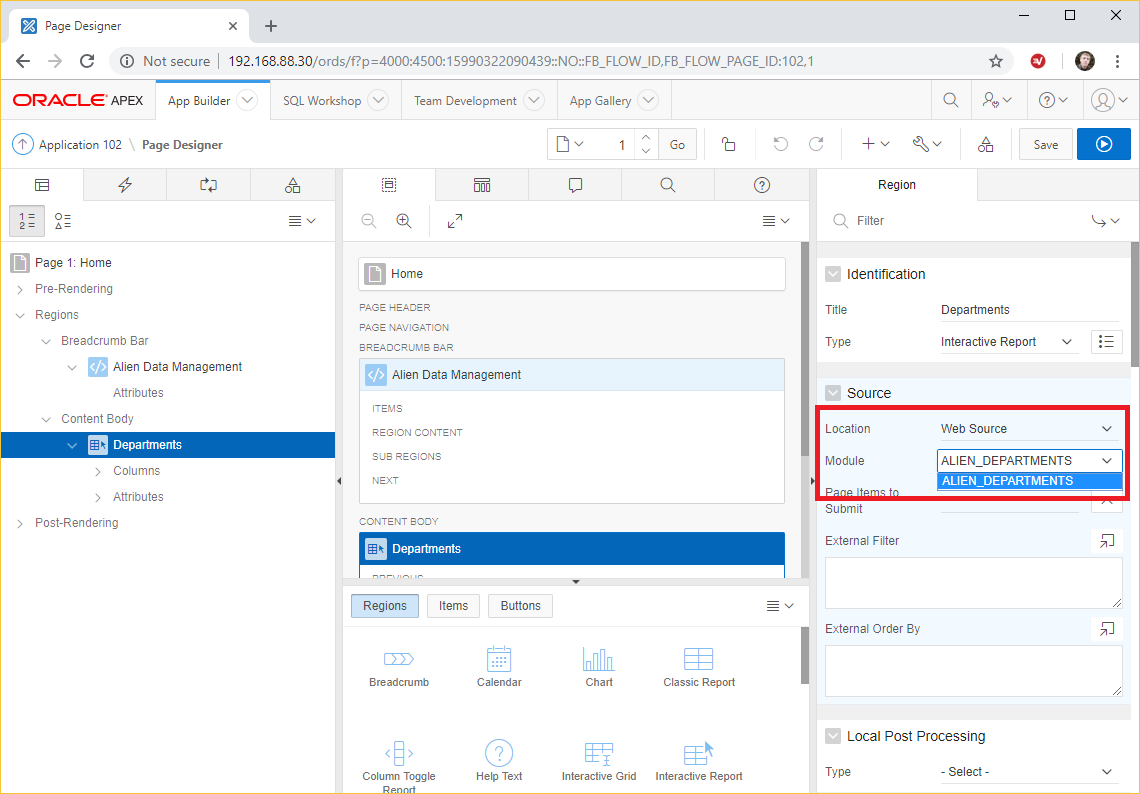
Go back to AppBuilder and edit your home page. Add an Interactive Report region to the Content Body section. Give it a proper name and base it on the Web Source we created before. You can rename the columns of the report as you wish their names to be.
Next we need to create a new Modal Dialog page which we are going to use to add a new row in our table. Create it and place a Static Content region on the page. Then add three Text Fields items (for the table attributes) and a Save button onto this region.
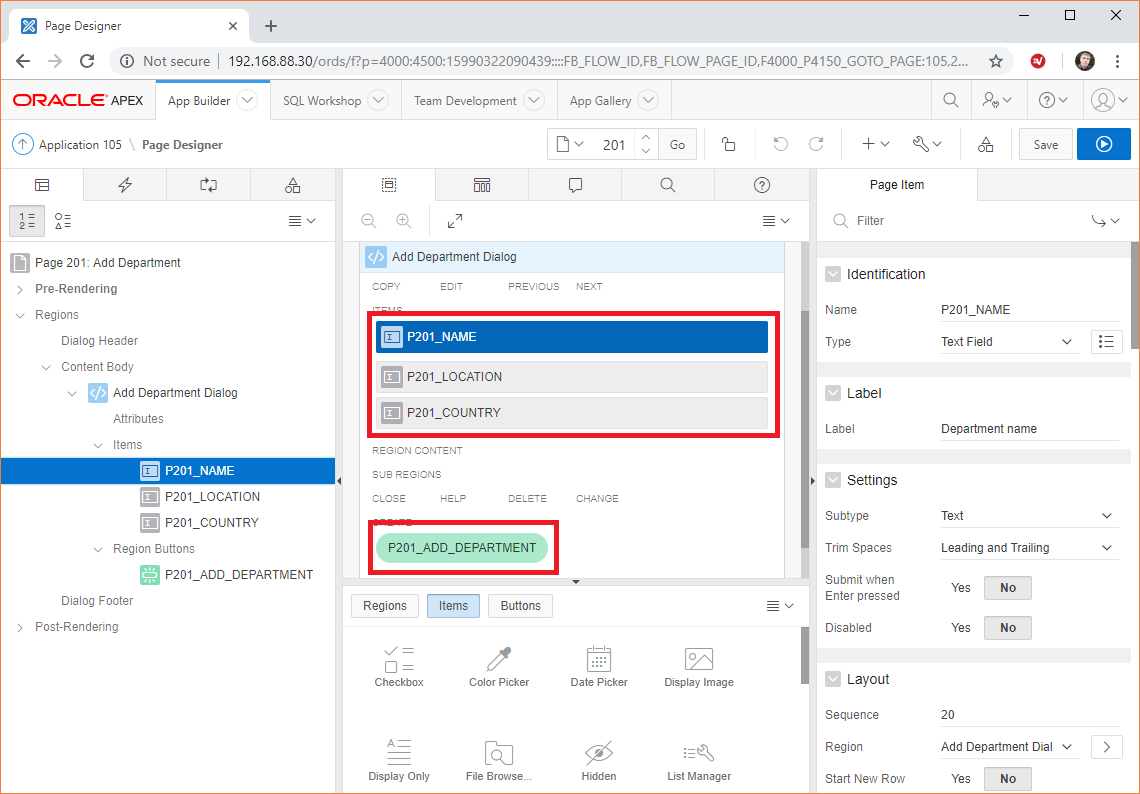
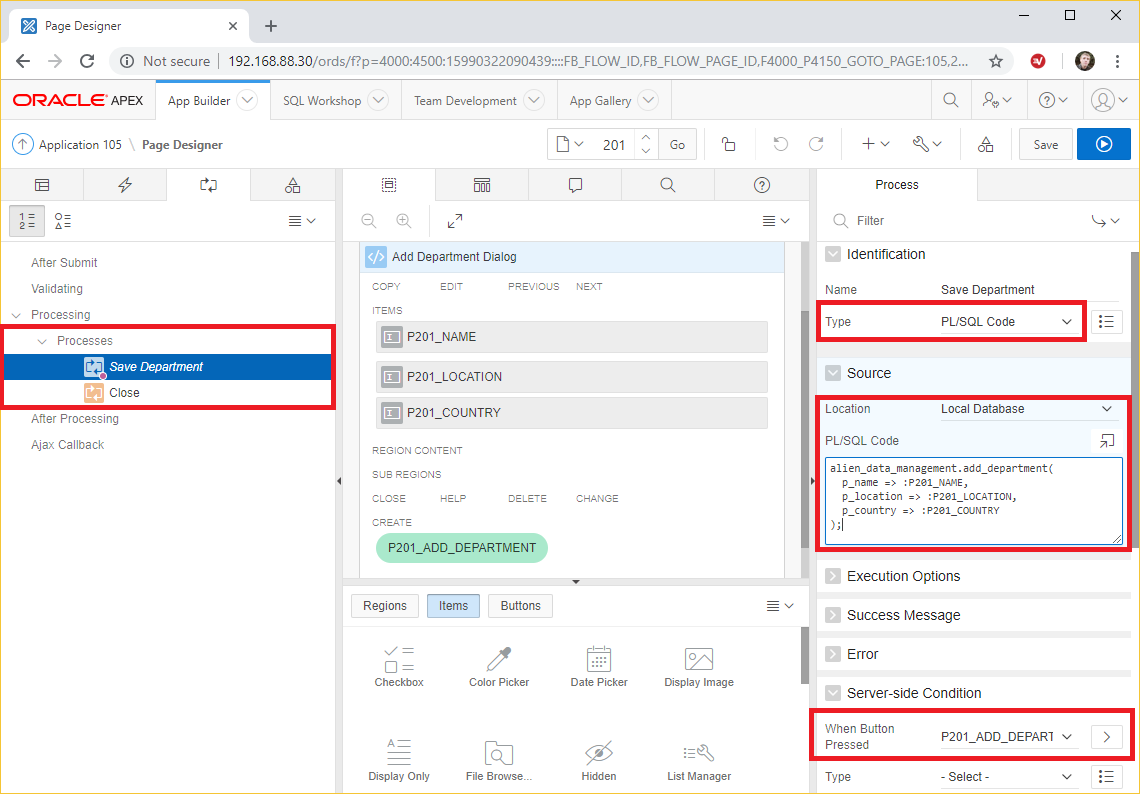
And finally, the most interesting part. In order for data to be saved, we need to add a PL/SQL process, which will invoke our add_department procedure when a user presses the Add department button. To fulfil our task, we need to add this code as the process source:
alien_data_management.add_department(
  p_name => :P201_NAME,
  p_location => :P201_LOCATION,
  p_country => :P201_COUNTRY
);
Assuming we did all this, our page should look as follows.
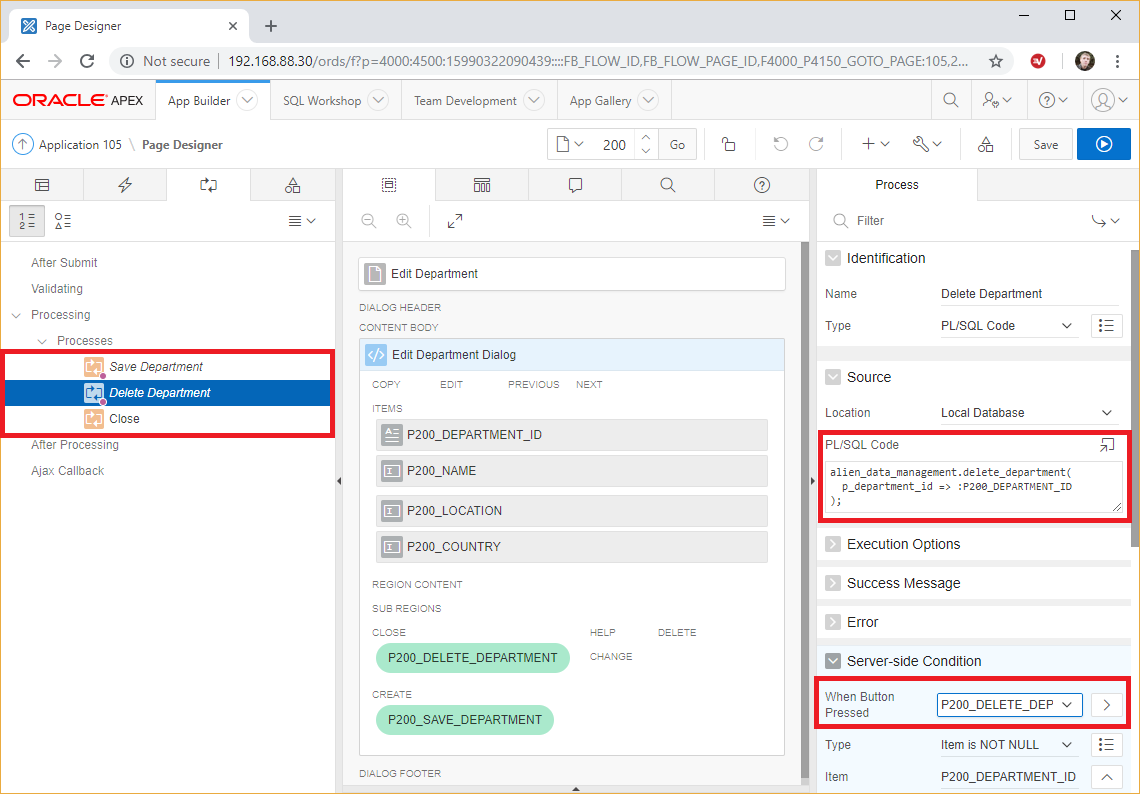
Ok, our Add a new department page is ready. Now it's time to make the same page for updating and deleting the existing rows. For this, you can copy the page we just created and rename it. Then, add a new Display Only item for department_id attribute, and instead of Add department there should be Save Changes and Delete department buttons.
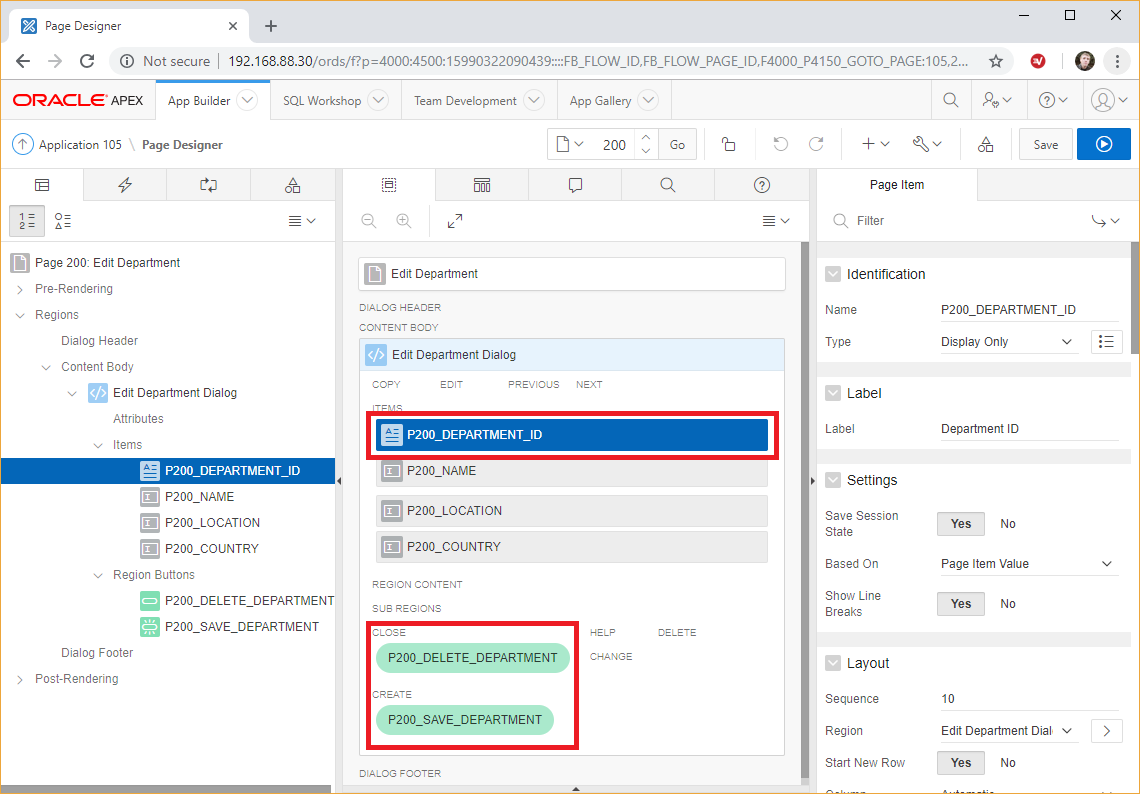
To go further, let's make two processes on this page - one for the UPDATE operation, and one for DELETE. Mind the server-side condition - a process should run only when a corresponding button is pressed.
For the Save Changes button process we need this code to be run:
alien_data_management.update_department(
  p_department_id => :P200_DEPARTMENT_ID,
  p_name => :P200_NAME,
  p_location => :P200_LOCATION,
  p_country => :P200_COUNTRY
);
When for the Delete button process it should be:
alien_data_management.delete_department(
  p_department_id => :P200_DEPARTMENT_ID
);
Save the page and check.
Well, we are now ready to link the home page with our form pages. For this, go back to the Home Page in AppBuilder and add a button to open the Add Department page. As a target, choose redirection to the corresponding page.
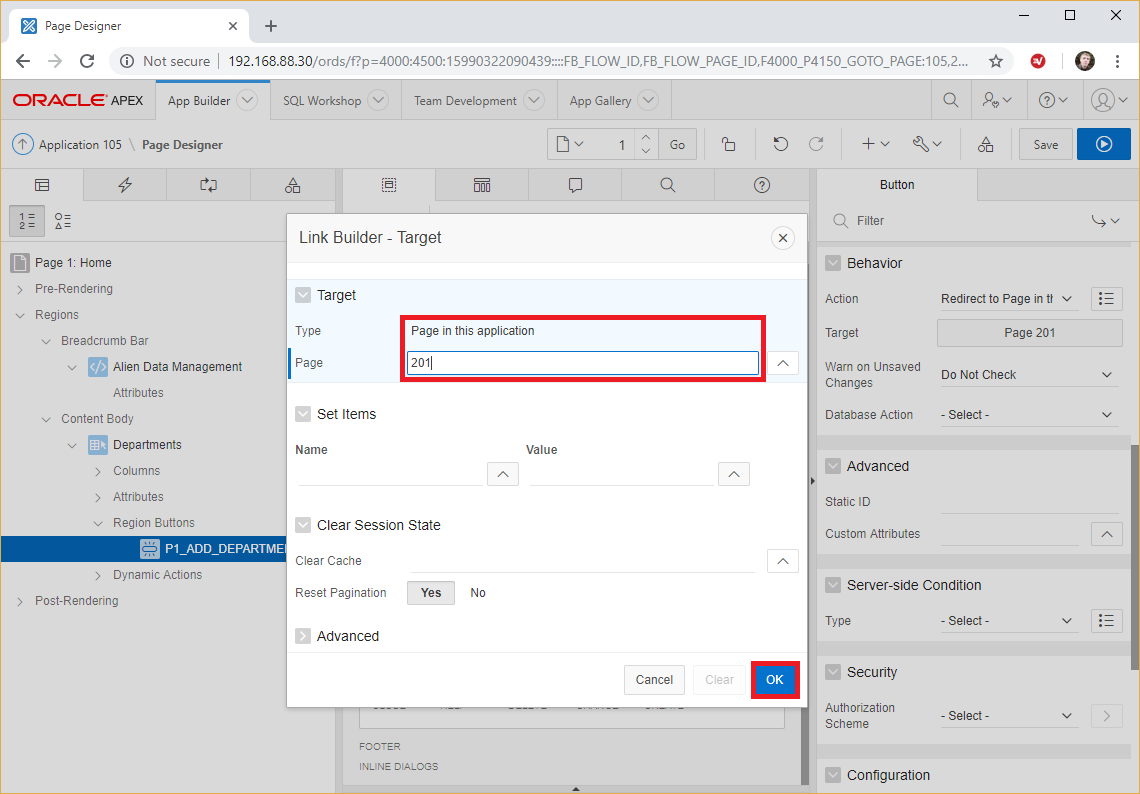
To link the Home Page with the Update Department page, let's add a link attribute for our report.
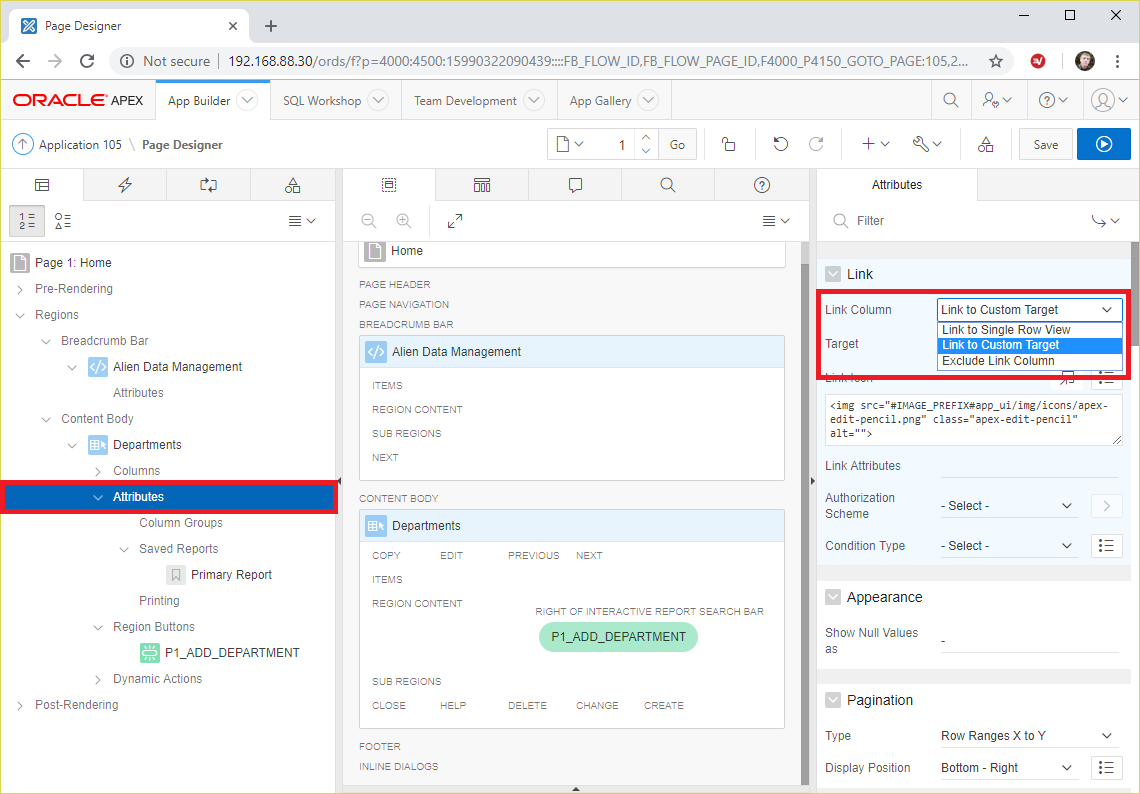
Then, we should specify the needed page number to redirect and don't forget to pass the current column values as field values.

Testing
If you did everything right, you are now ready to test the application. And the first thing you're going to see when you run the app, will be our interactive report based on data from alien PostgreSQL database.
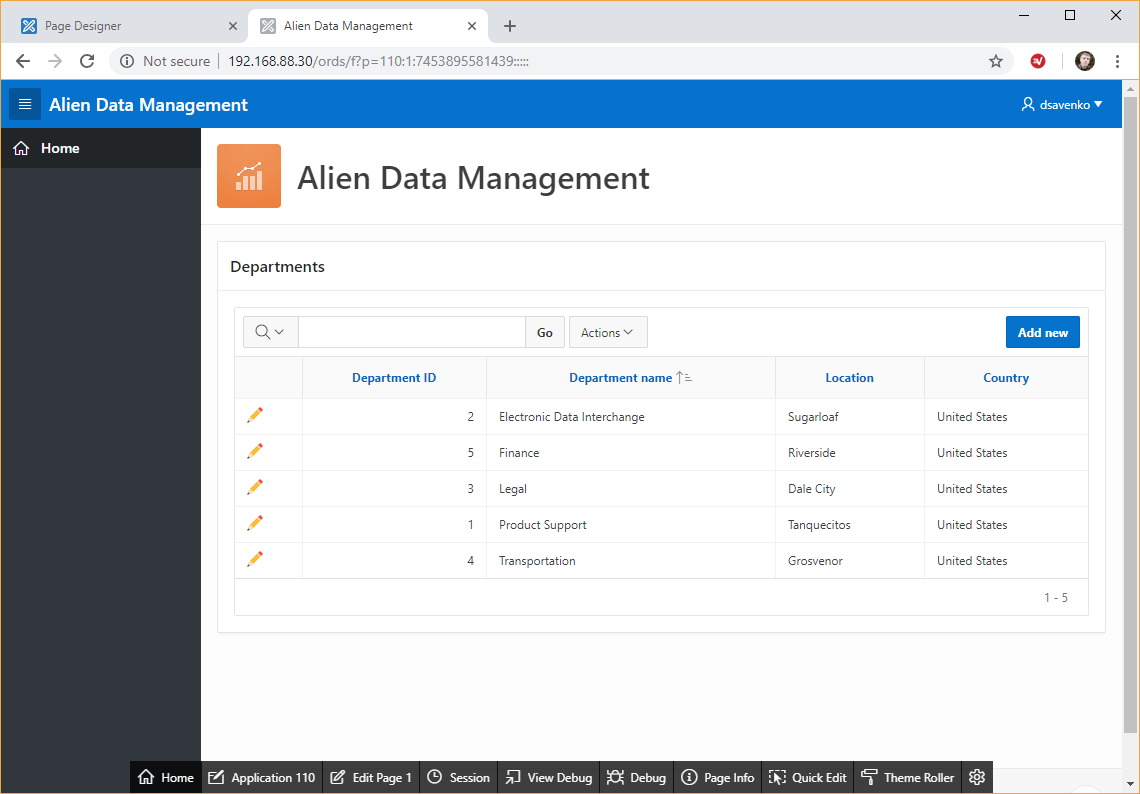
Let's compare with what we have in the database:
# psql -U restapi
Password for user restapi:
psql (10.5)
Type "help" for help.

restapi=> select * from departments;
 department_id |            name             |  location   |    country
---------------+-----------------------------+-------------+---------------
             1 | Product Support             | Tanquecitos | United States
             2 | Electronic Data Interchange | Sugarloaf   | United States
             4 | Transportation              | Grosvenor   | United States
             5 | Finance                     | Riverside   | United States
             3 | Legal                       | Dale City   | United States
(5 rows)
Ok, looks familiar, but let's add a row.
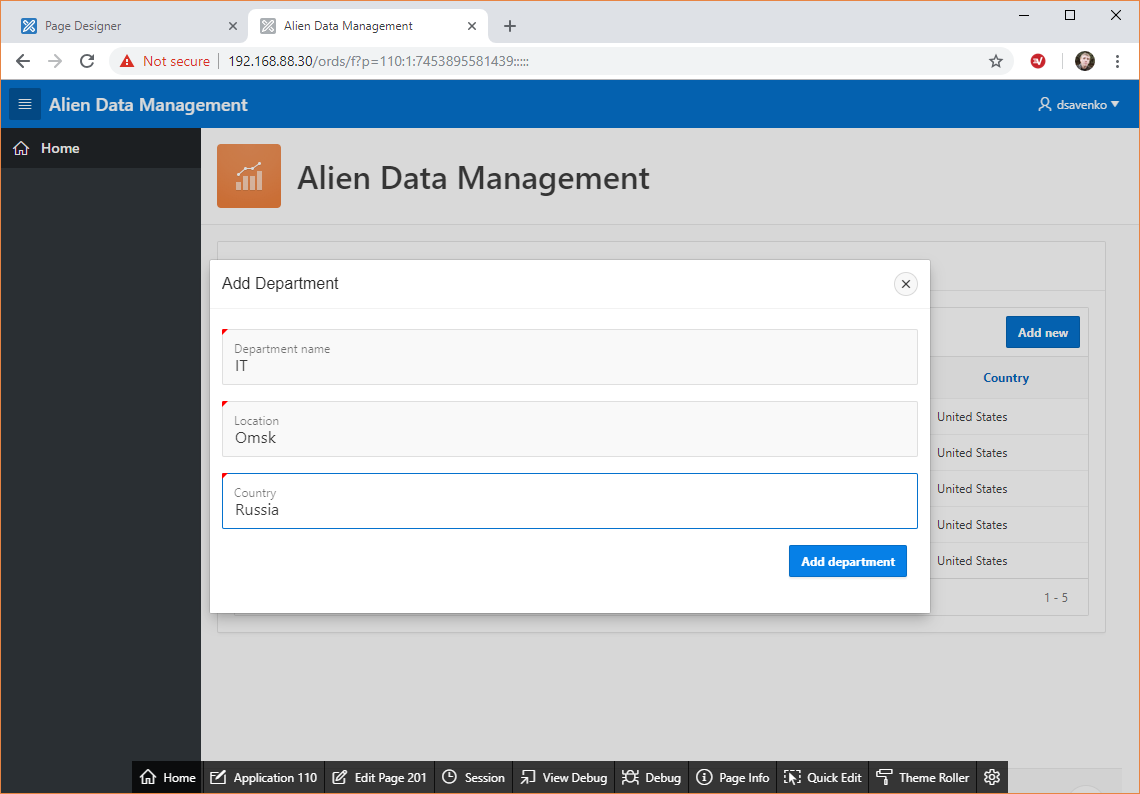
After clicking on the Add department button, we see our new row in the report.
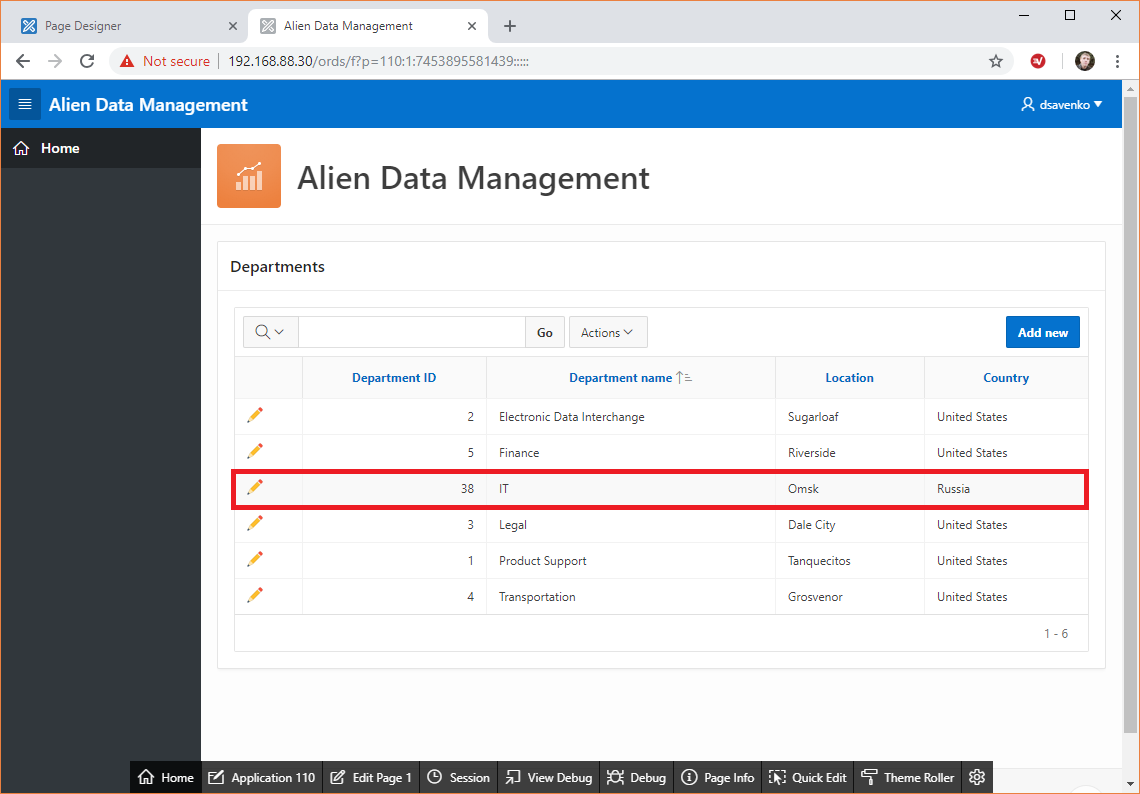
But maybe I tricked you and this row wasn't actually sent to the foreign database? Let's check it:
restapi=> select * from departments;
 department_id |            name             |  location   |    country
---------------+-----------------------------+-------------+---------------
             1 | Product Support             | Tanquecitos | United States
             2 | Electronic Data Interchange | Sugarloaf   | United States
             4 | Transportation              | Grosvenor   | United States
             5 | Finance                     | Riverside   | United States
             3 | Legal                       | Dale City   | United States
            38 | IT                          | Omsk        | Russia
(6 rows)
Seems I didn't trick you and our row is there! As a homework, test the UPDATE and DELETE operations on your own.
It could be harsh, but I tried to show you that it's not hard to make an application, capable to consume data from a foreign database and write it back there, even now, and this can be done in an almost declarative way.
Programmatic or APEX_WEB_SERVICE way
In this section I am going to tell you about an alternative, lower-level approach to achieve the same results. This time we are going to organize same interface on top of the employees table.
This approach doesn't require any Web Source Module defined under Shared Components for the application. Instead of this, we are going to perform these steps:
- Implement CRUD functionality in our PL/SQL package by leveraging of
APEX_WEB_SERVICEAPI. - Create another Interactive Report and base it on a local PL/SQL pipelined function.
- Implement writing capabilities of the report using APEX processes invoking the other PL/SQL package procedures.
I also should warn you that in this chapter I am not going to describe things in as detailed way as I did it before. So, my aim here is to highlight main differences in the approaches.
Additionally, I assume that we will be using the same package we created in the previous chapter. Ok, let's get it started.
The code
So, we are going to base our Interactive Report on top of a pipelined function. One of the easiest ways to implement this function is to invoke a GET request by leveraging of APEX_WEB_SERVICE.MAKE_REST_REQUEST API, get the data in JSON format and then transform it to a relational view by using of the JSON_TABLE function, which is there for us since 12c.
But first we need to define a set of data type for the function result set and the function itself in the package specification:
type t_employee is record (
  employee_id integer,
  department_id integer,
  name varchar2(50),
  email varchar2(255),
  cost_center integer,
  date_hired date,
  job varchar2(255)
);

type tbl_employees is table of t_employee;

function get_employees return tbl_employees pipelined;
Now, let's define its body:
function get_employees return tbl_employees pipelined
is
  E_NO_MORE_ROWS_NEEDED exception;
  pragma exception_init(E_NO_MORE_ROWS_NEEDED, -6548);
  l_response clob;
begin
  -- REST request to get JSON data from alien database
  l_response := apex_web_service.make_rest_request(
    p_url => 'http://192.168.88.31:8000/employees',
    p_http_method => 'GET'
  );

  -- converting JSON data to relational view
  -- and returning it as result set
  for x in (
    select
      employee_id,
      department_id,
      name,
      email,
      cost_center,
      date_hired,
      job
   from json_table(
      l_response,
      '$[*]' columns (
        employee_id integer,
        department_id integer,
        name varchar2(50),
        email varchar2(255),
        cost_center integer,
        date_hired date,
        job varchar2(255)
      )
    )
  ) loop
    pipe row(
      t_employee(
        x.employee_id,
        x.department_id,
        x.name,
        x.email,
        x.cost_center,
        x.date_hired,
        x.job
      )
    );
  end loop;

  return;
-- APEX reacts inadequately on `NO MORE ROWS NEEDED` exception
-- and generates `404 Not Found` error if not suppress it
-- more here: https://community.oracle.com/thread/4076787
exception when E_NO_MORE_ROWS_NEEDED then
  null;
end get_employees;
As you can see, at the beginning the function calls the corresponding API endpoint (http://192.168.88.31:8000/employees in our case) using the GET HTTP method and writes the response to a variable. Then, using power of JSON_TABLE function, it translates JSON-formatted data into relational and returns it as a result.
Also keep in mind the fact that it is important to suppress the NO MORE ROWS NEEDED exception, which a pipelined function could generate if all data to return cannot be placed on one page of a report. Otherwise, APEX engine will generate a 404 Not Found exception. This is a known issue.
Now we are going to define the writing procedures, first in the package specification:
procedure add_employee(
  p_department_id integer,
  p_name varchar2,
  p_email varchar2,
  p_cost_center integer,
  p_date_hired date,
  p_job varchar2
);

procedure update_employee(
  p_employee_id integer,
  p_department_id integer,
  p_name varchar2,
  p_email varchar2,
  p_cost_center integer,
  p_date_hired date,
  p_job varchar2
);

procedure delete_employee(
  p_employee_id integer
);
And then in the package body:
procedure add_employee(
  p_department_id integer,
  p_name varchar2,
  p_email varchar2,
  p_cost_center integer,
  p_date_hired date,
  p_job varchar2
) is
  l_json_body json_object_t := json_object_t();
  l_response clob;
begin
  -- setting HTTP headers before the REST API call
  apex_web_service.g_request_headers(1).name := 'Content-Type';
  apex_web_service.g_request_headers(1).value := 'application/json; charset=utf-8';

  -- preparation of the body
  -- put method of the json_object_t type accepts various data types
  l_json_body.put(key => 'department_id', val => p_department_id);
  l_json_body.put(key => 'name', val => p_name);
  l_json_body.put(key => 'email', val => p_email);
  l_json_body.put(key => 'cost_center', val => p_cost_center);
  l_json_body.put(key => 'date_hired', val => p_date_hired);
  l_json_body.put(key => 'job', val => p_job);

  -- REST request to alien database to perform insert operation
  l_response := apex_web_service.make_rest_request(
    p_url => 'http://192.168.88.31:8000/employees',
    p_http_method => 'POST',
    p_body => l_json_body.to_clob()
  );

end add_employee;

procedure update_employee(
  p_employee_id integer,
  p_department_id integer,
  p_name varchar2,
  p_email varchar2,
  p_cost_center integer,
  p_date_hired date,
  p_job varchar2
) is
  l_json_body json_object_t := json_object_t();
  l_url varchar2(200);
  l_response clob;
begin
  -- setting HTTP headers before the REST API call
  apex_web_service.g_request_headers(1).name := 'Content-Type';
  apex_web_service.g_request_headers(1).value := 'application/json; charset=utf-8';

  -- preparation of the body
  -- put method of the json_object_t type accepts various data types
  l_json_body.put(key => 'department_id', val => p_department_id);
  l_json_body.put(key => 'name', val => p_name);
  l_json_body.put(key => 'email', val => p_email);
  l_json_body.put(key => 'cost_center', val => p_cost_center);
  l_json_body.put(key => 'date_hired', val => p_date_hired);
  l_json_body.put(key => 'job', val => p_job);

  -- prepare the URL
  -- have not found a better way to specify query string parameters
  l_url := 'http://192.168.88.31:8000/employees?employee_id=eq.'||to_char(p_employee_id);

  -- REST request to alien database to perform update operation
  l_response := apex_web_service.make_rest_request(
    p_url => l_url,
    p_http_method => 'PATCH',
    p_body => l_json_body.to_clob()
  );

end update_employee;

procedure delete_employee(
  p_employee_id integer
) is
  l_url varchar2(200);
  l_response clob;
begin
  -- setting HTTP headers before the REST API call
  apex_web_service.g_request_headers(1).name := 'Content-Type';
  apex_web_service.g_request_headers(1).value := 'application/json; charset=utf-8';

  -- prepare the URL
  -- have not found a better way to specify query string parameters
  l_url := 'http://192.168.88.31:8000/employees?employee_id=eq.'||to_char(p_employee_id);

  -- REST request to alien database to perform update operation
  l_response := apex_web_service.make_rest_request(
    p_url => l_url,
    p_http_method => 'DELETE'
  );

end delete_employee;
Look how these procedures are different from the ones we wrote in the previous chapter to manage departments.
Here we have to manually set the needed HTTP headers by populating of apex_web_service.g_request_headers collection, because we don't have prepared metadata for this Web Source. Then, we prepare a request body manually. Luckily, in 18c we have very powerful json_object_t data type to help us here - with it we don't have to worry about formatting and data types of the attributes to be put to a JSON string. And the last thing done by the writing procedures, is a REST API call of a corresponding HTTP method.
The report and the form
Again, it's time to go back to AppBuilder and edit your home page. Now add another Interactive Report region to the Content Body section. Give it a proper name to reflect management of the employees table this time. Then specify to base your report on SQL query, and use this query as a source:
select
    employee_id,
    department_id,
    name,
    email,
    cost_center,
    date_hired,
    job
from alien_data_management.get_employees();
Then you can rename the columns of the report following your preferences. As a result you should get something like this.
The further steps are quite analogical to the ones we performed in the previous chapter. The only difference is in the set of attributes and names of procedures to use. So, I am going to leave them for you to perform them yourselves.
Testing
In case you were brave enough to finish the task, you are ready to test the implemented functionality. Run the application and have a look at the report.

So, we see some data. And that's what we have in the database:
restapi=> select * from employees order by name limit 10;
 employee_id | department_id |        name        |            email            | cost_center | date_hired |            job
-------------+---------------+--------------------+-----------------------------+-------------+------------+----------------------------
         124 |             1 | August Arouri      | august.arouri@aaam.com      |          54 | 2018-08-07 | Customer Advocate
         117 |             1 | August Rupel       | august.rupel@aaaf.com       |           1 | 2018-10-04 | Analyst
         126 |             1 | Ayana Barkhurst    | ayana.barkhurst@aaao.com    |          42 | 2018-08-26 | Sustaining Engineering
         122 |             1 | Carlotta Achenbach | carlotta.achenbach@aaak.com |          99 | 2018-10-22 | Marketing Manager
         120 |             1 | Chaya Greczkowski  | chaya.greczkowski@aaai.com  |          55 | 2018-09-05 | Support Specialist
         131 |             1 | Dania Grizzard     | dania.grizzard@aaat.com     |          53 | 2018-10-30 | Project Manager
         114 |             1 | Dean Bollich       | dean.bollich@aaac.com       |          83 | 2018-08-14 | Usability Engineer
         113 |             1 | Gricelda Luebbers  | gricelda.luebbers@aaab.com  |          82 | 2018-11-06 | Marketing Associate
         132 |             1 | Inez Yamnitz       | inez.yamnitz@aaau.com       |          75 | 2018-09-18 | HR Representitive
         123 |             1 | Jeraldine Audet    | jeraldine.audet@aaal.com    |          41 | 2018-08-18 | Quality Control Specialist
(10 rows)
Looks suspiciously similar, doesn't it? Now let's change an employee's data and click the Save changes button.

The changed row is there in our report.
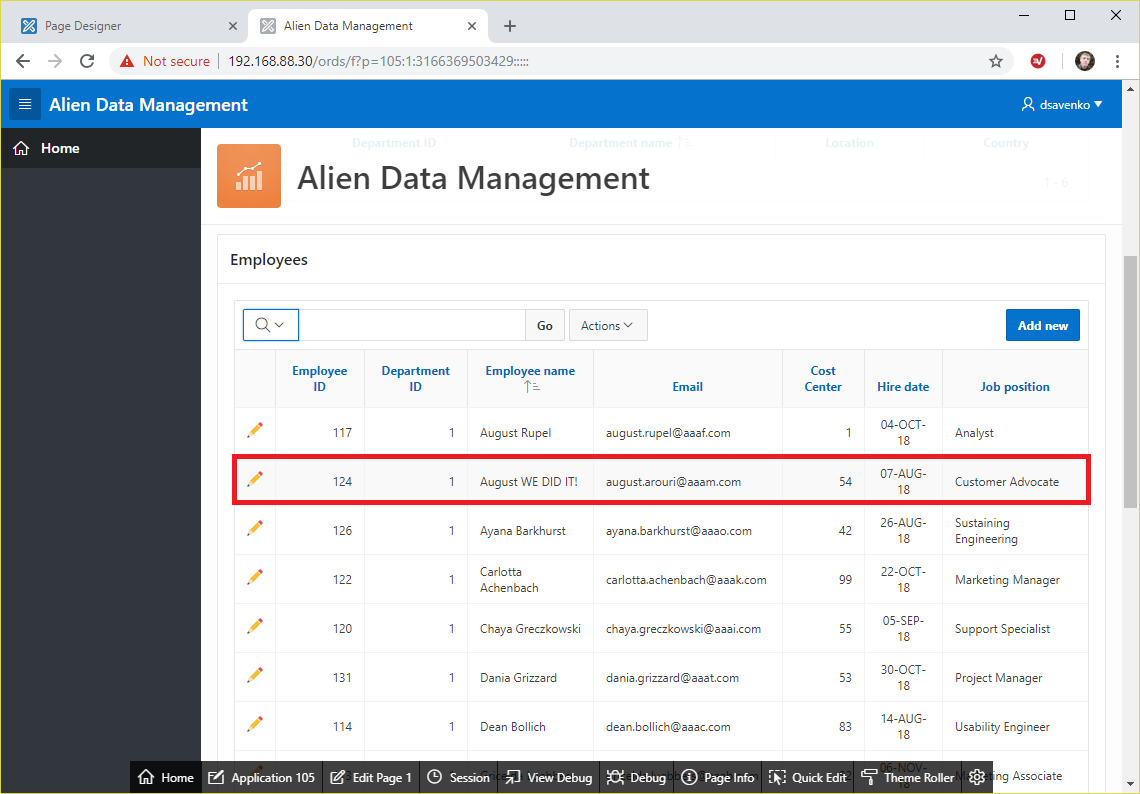
But what about the database side?
restapi=> select * from employees order by name limit 10;
 employee_id | department_id |        name        |            email            | cost_center | date_hired |            job
-------------+---------------+--------------------+-----------------------------+-------------+------------+----------------------------
         117 |             1 | August Rupel       | august.rupel@aaaf.com       |           1 | 2018-10-04 | Analyst
         124 |             1 | August WE DID IT!  | august.arouri@aaam.com      |          54 | 2018-08-07 | Customer Advocate
         126 |             1 | Ayana Barkhurst    | ayana.barkhurst@aaao.com    |          42 | 2018-08-26 | Sustaining Engineering
         122 |             1 | Carlotta Achenbach | carlotta.achenbach@aaak.com |          99 | 2018-10-22 | Marketing Manager
         120 |             1 | Chaya Greczkowski  | chaya.greczkowski@aaai.com  |          55 | 2018-09-05 | Support Specialist
         131 |             1 | Dania Grizzard     | dania.grizzard@aaat.com     |          53 | 2018-10-30 | Project Manager
         114 |             1 | Dean Bollich       | dean.bollich@aaac.com       |          83 | 2018-08-14 | Usability Engineer
         113 |             1 | Gricelda Luebbers  | gricelda.luebbers@aaab.com  |          82 | 2018-11-06 | Marketing Associate
         132 |             1 | Inez Yamnitz       | inez.yamnitz@aaau.com       |          75 | 2018-09-18 | HR Representitive
         123 |             1 | Jeraldine Audet    | jeraldine.audet@aaal.com    |          41 | 2018-08-18 | Quality Control Specialist
(10 rows)
So this is real! And it's done for the second time, using a different approach.
In fact, we could implement an even more programmatic approach using the UTL_HTTP package, but in this case we would need to write much more code to achieve the same results. Although, in that case we would have even more control of what is done by our procedures.
Downloads
Ok guys, I have good news for you - for those who had some issues with creating of the application on their own, I uploaded the source code of the stuff we were developing here to GitHub. You are free to download and use it in any way you like (don't forget to change the IPs).
The uploaded project consists of:
- PostgreSQL database schema and sample data script
ALIEN_DATA_MANAGEMENTPL/SQL package- APEX application export script.
You can find it here: https://github.com/ZZa/apex-on-postgresql-sample
Conclusion
By this very long article I tried to answer the question if it is mandatory to use exactly Oracle Database to store APEX application data. And as you can see, the answer is NO, you are welcome to use any database and DBMS of your preference to base your APEX application on, and you can do it right now, though not in a fully declarative way. In fact, the choice of RDBMS isn't limited by PostgreSQL or MySQL - it literally could be anything with a proper REST API on top of it.
This means you can go for a free Express Edition of Oracle Database to integrate APEX with your companies existing projects. It won't work as fast and smooth as it could if you based your application on a local Oracle Database, but it still has loads of use-cases.
Of course, the code, I demonstrated here, could be improved in many aspects - we could add proper error handling, modularize it better or make it more universal. But my aim here was to mostly show WHAT YOU CAN DO, not write an ideal application. I also should warn you about the fact that I used very simple examples in my post, and if you need much more complex queries or transactions, it would be a good idea to consider using REST API on views of stored procedures, defined in the remote database.
Do not hesitate to comment on the topic if you have something to add or a question appeared in your head - together we will try to sort it out. You are also welcome with you suggestions on how to improve the article.
Drop me a message any time if you feel I could be useful for you, and we give your problem a closer look.